Spotlight On: Custom Vinylmation Artist Brian Shapiro

We recently put out a call for custom artist designs on the new Vinylmation 95 mold and have received a great response! Keep those customs coming. Today, we feature an artist familiar to DV, Brian Shapiro.

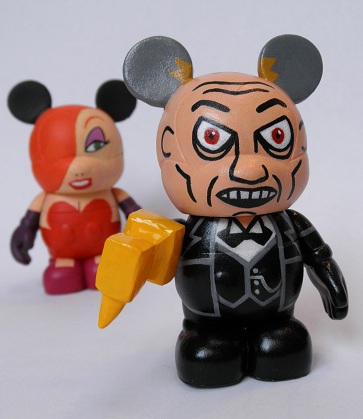
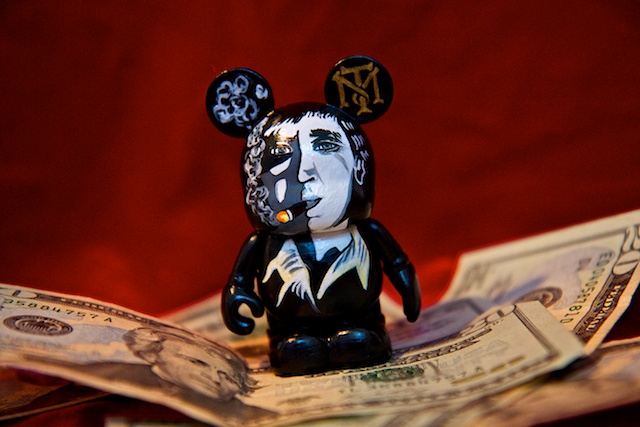
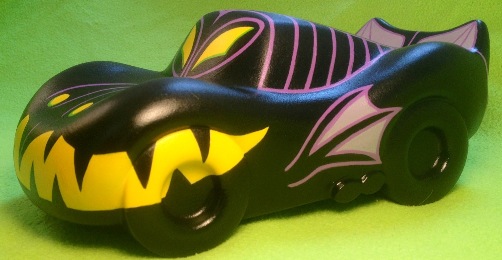
Destination Vinylmation: What inspired you to choose Maleficent as the subject of your first Vinylmation 95 custom?
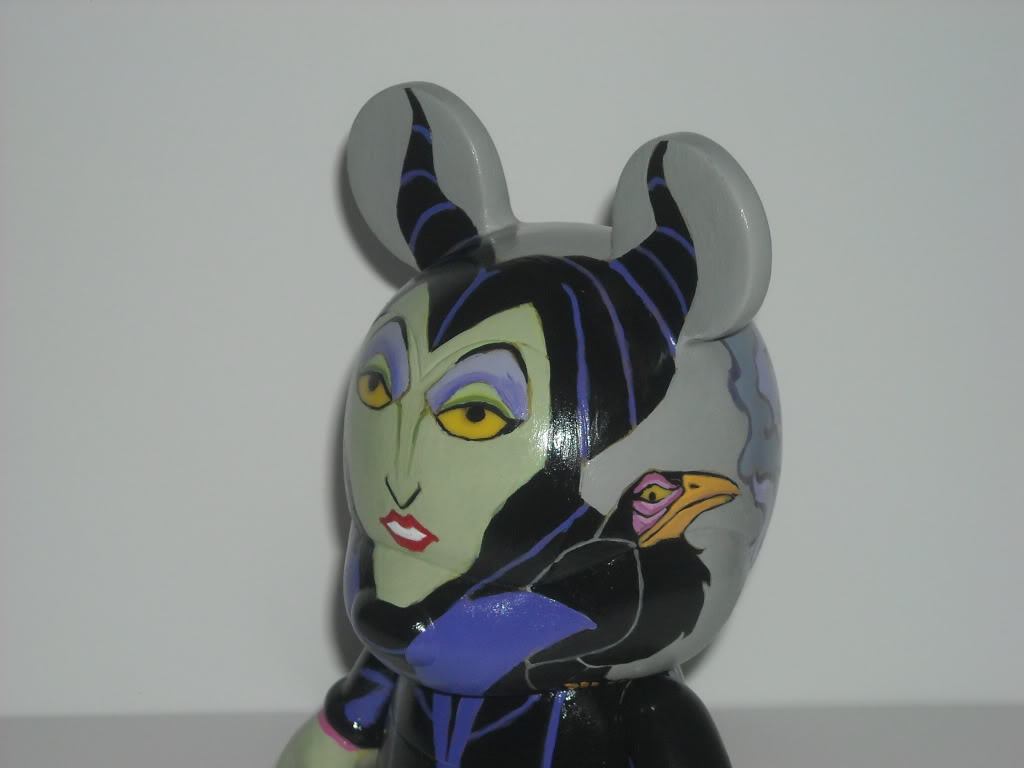
Brian Shapiro: Maleficent is my hands down favorite Disney Villain.  Whether she’s in Sleeping Beauty, Fantasmic, or even Kingdom Keepers, she never disappoints!  Also, I think she has the most striking features in both her humanoid and dragon forms!

DV: You managed to place all of Maleficent’s iconic features onto the canvas to make it instantly recognizable. Did this take much planning on paper, or were you able to instantly picture it on the mold?
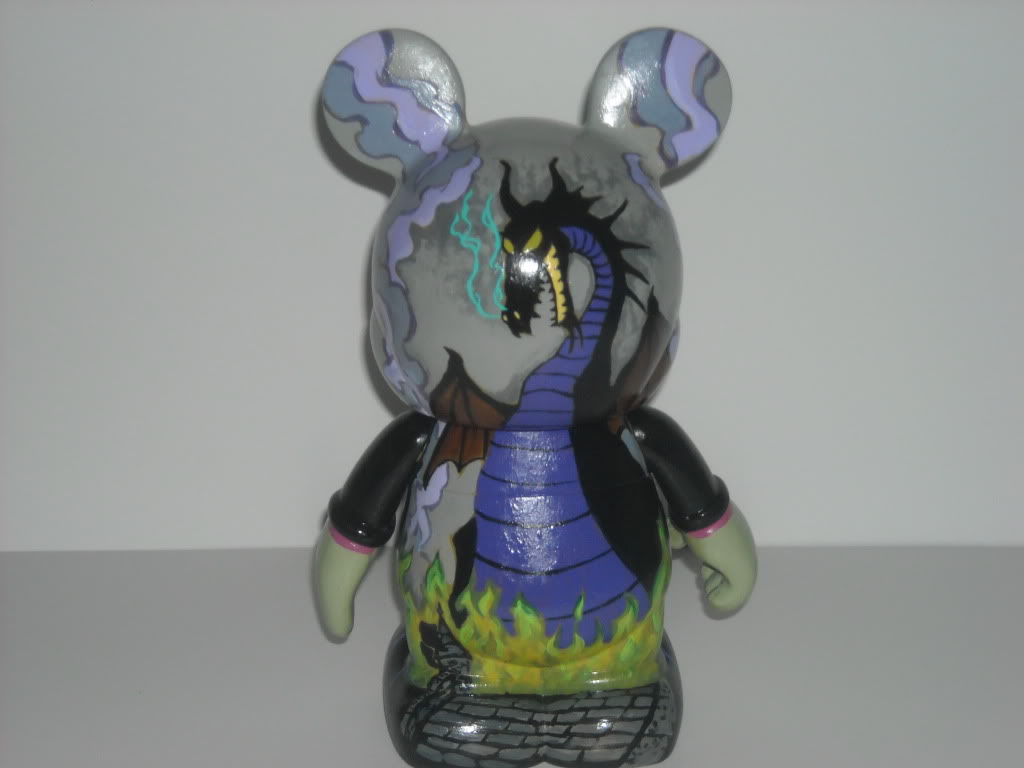
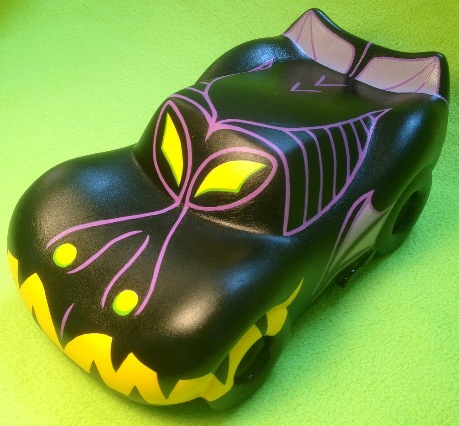
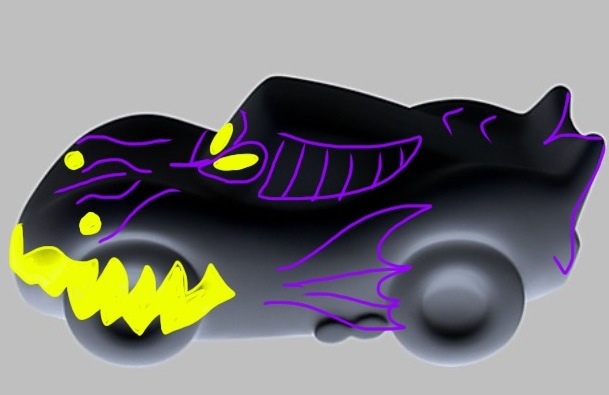
Brian: When I saw the Vinylmation 95 canvas for the first time, I immediately noticed the horn shaped side windows and instantly thought of the Maleficent dragon.  From that starting point, it was easy to imagine her features on the new mold.  The hood of the car worked perfectly for the snout, and the spoiler was a perfect place for wings.  I did sketch out the design, though, before painting it.  I downloaded an image of the canvas from disneystore.com and inverted the colors on my iPad to make it black.  Then I used a paint program to layout the basic design features.  In the end, she came out looking exactly as I imagined her!

CPU Rendering

DV: What was the most challenging part of the this design?
Brian: The most challenging part was the placement of the wings.  While the spoiler on the back of the car was an ideal location, it wasn’t split down the midline to provide two separate wings.  As a result, I had to take some artistic license and make the wings appear pressed together in the midline.  I’m really happy with how they came out.

DV: You pulled off exactly what I hoped an artist would do. You ignored the features of the car itself (tires, windshield, etc.) and just painted a design onto the canvas… sort of like an artist ignoring the placement of eyes, feet or arms on a Mickey shape. Was this difficult to do?
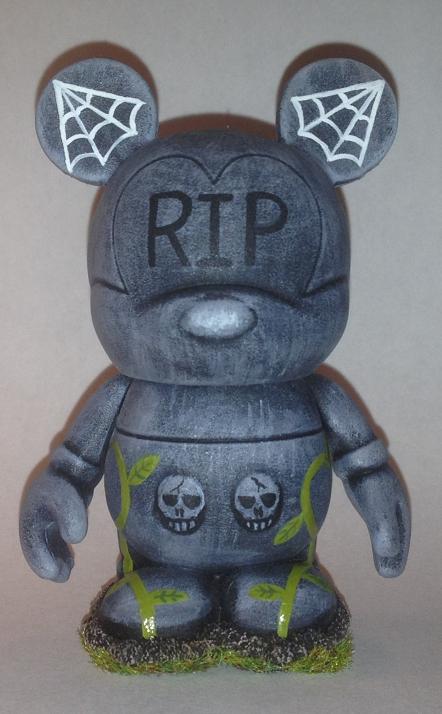
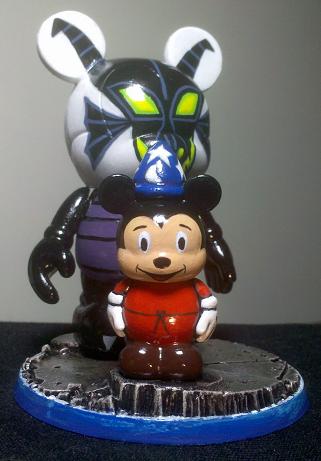
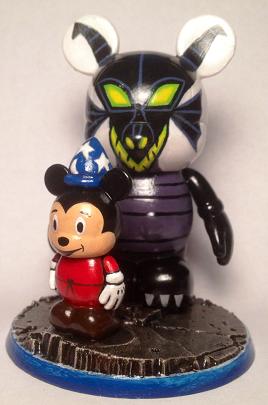
Brian: Not with this particular design, which was pretty obvious to me once I saw the canvas.  As you have previously spotlighted, I created a version of the Maleficent dragon on the 3″ Mickey shaped mold, and Disney recently released a version on the 9″ Mickey shaped mold, but a lot of compromises had to be made in both of those instances.  I think the Vinylmation 95 canvas is ideal for characters with snouts and bills like Figment, Donald, Goofy, and Pluto.

DV: As an artist, what is the major difference between working on a Lightning McQueen shaped mold as opposed to Mickey?
Brian: Other than the shape, I think the biggest difference is that you can’t disassemble the figure into separate pieces like you can with the Mickey shaped mold.  As a result, you are forced to handle the figure in areas that have already been painted.  Because the Maleficent dragon is mostly black in color, it was hard for me to keep the black paint clean.  Every little piece of dust would show, and if I had the slightest trace of yellow or purple on my fingers, it would appear where it wasn’t supposed to.  In this case, once I finished painting in all the features, I placed her on top of a jar of peanut butter and painted back in all the black areas!

DV: Did you enjoy working on the Vinylmation 95 mold enough to do more?
Brian: I really enjoyed working with the canvas a lot!  Ironically, I’m not a huge fan of the Cars movies or even cars in general, but I think the Vinylmation 95 canvas has a lot of potential.  I have another blank that I would like to paint.

DV: Can you give us any hints to what we might see next?
Brian: I have a few ideas, but I’m undecided on which one I will pursue.  I will definitely keep you posted, and I appreciate your generous support of my art!

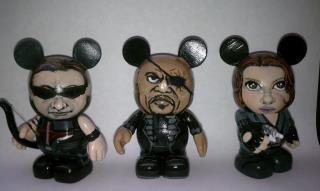
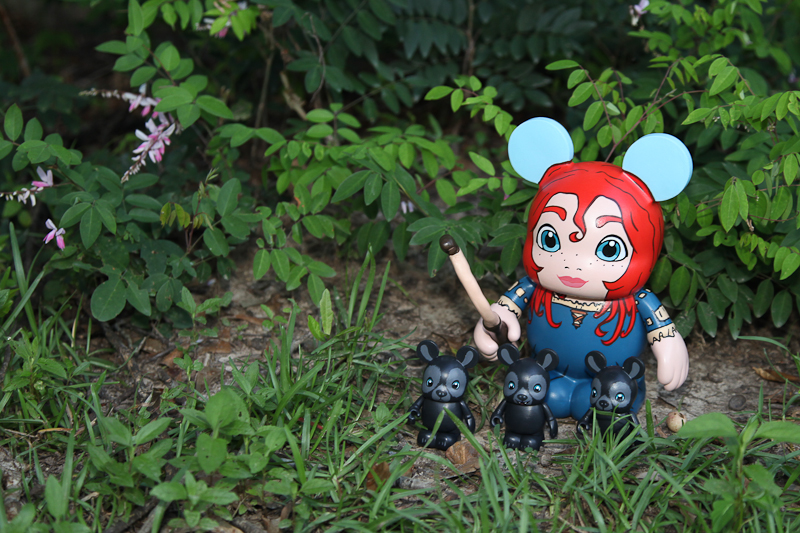
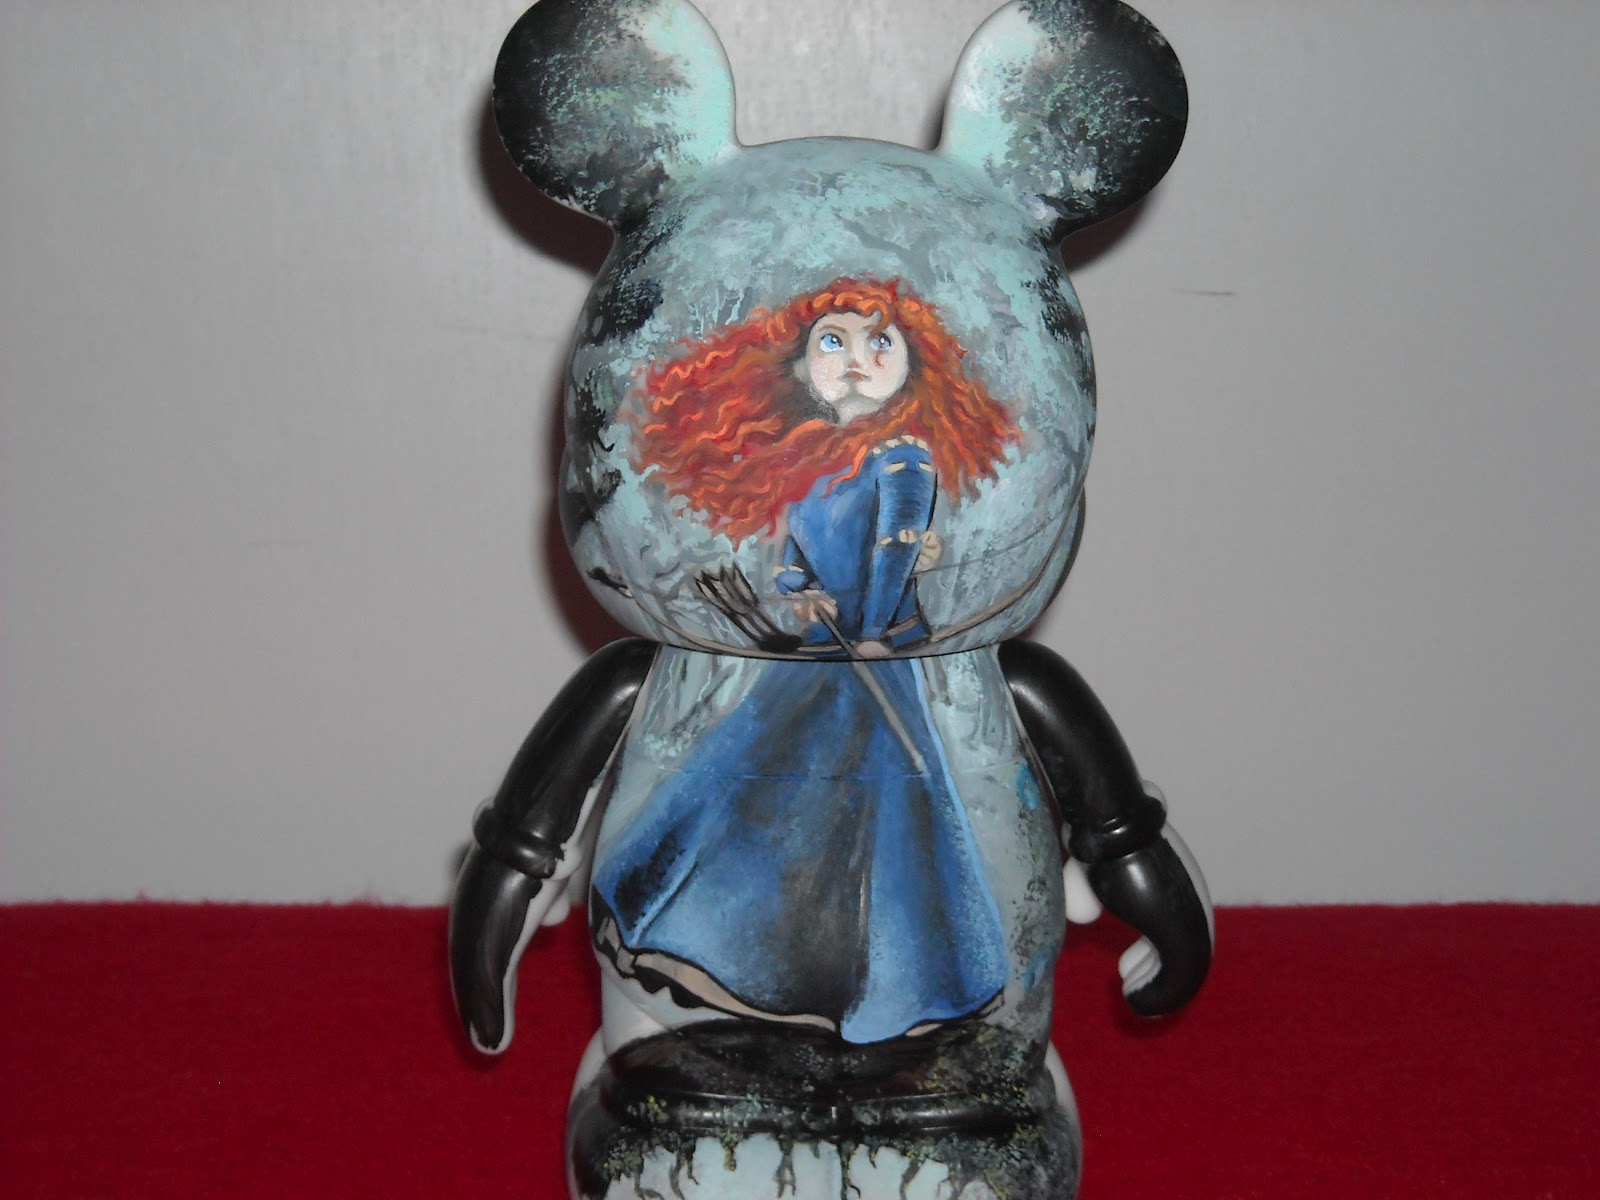
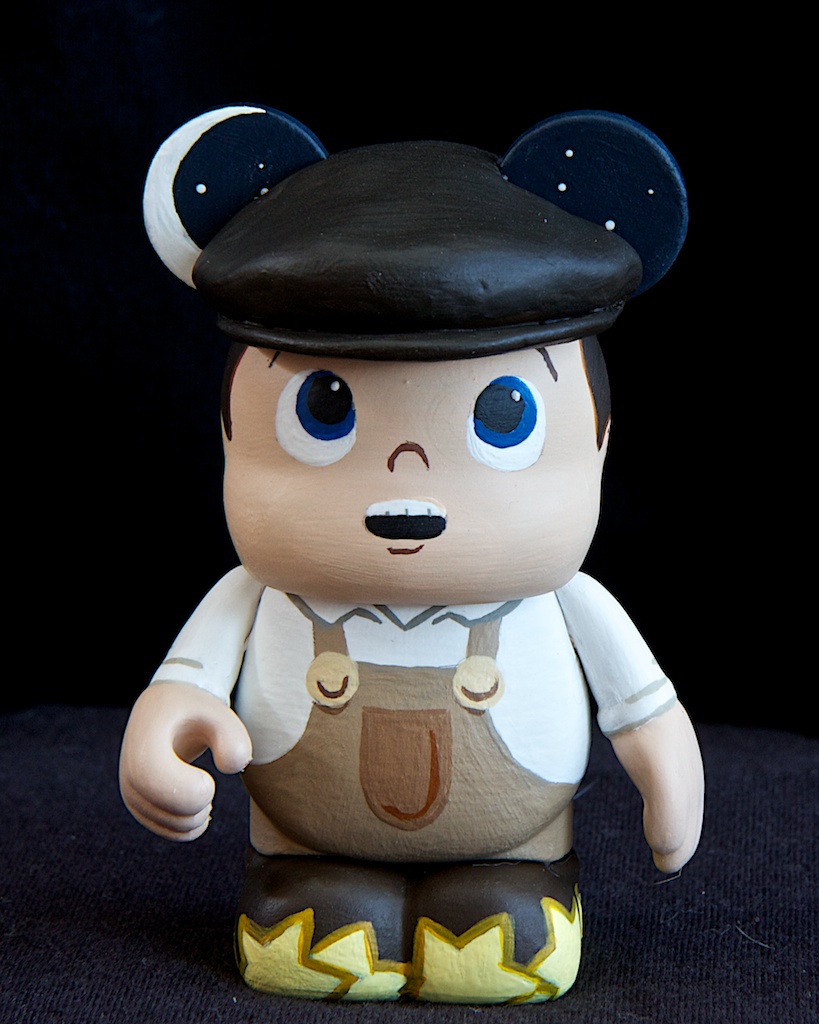
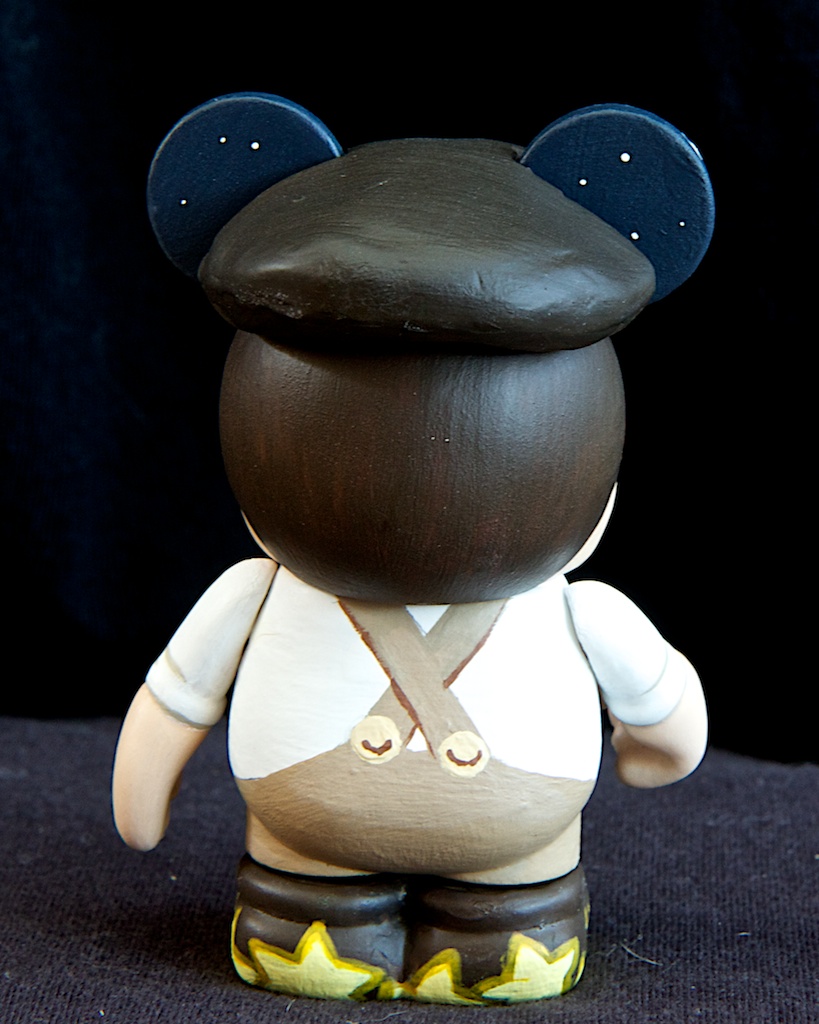
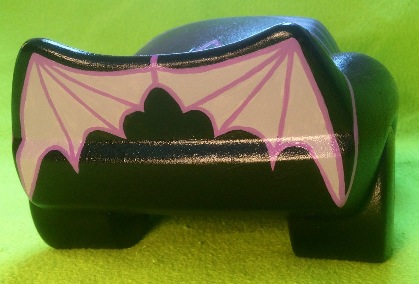
P.S. – Brian sent us a little tease of his next project just before this article went live:

Spotlight On: Custom Vinylmation Artist Brian Shapiro


Email DestinationVinylmation@gmail.com if you would like to have your work spotlighted.
– 

Destination Vinylmation: As an artist, what drew you to the medium of Vinylmation?

Brian Shapiro: I’ve been doing film making as a hobby since I was 10 years old. I especially love animation, and I began creating clay animated films on super 8mm film when I was in elementary school. Years later, after I got my first PC computer, I started creating animated films using Flash. I even used Flash to produce an illustrated children’s picture book called Plaquetooth (www.plaquetooth.com) in 2008.

It was during a trip to Walt Disney World in May of 2009 that I was introduced to Vinylmation. In planning my trip online, I had stumbled upon an image of the Park Series #1 Kermit, and I was so intrigued at how a figure shaped like Mickey Mouse had been painted to look like Kermit the Frog! When I arrived at the parks, Park Series #2 had just been released, and I purchased my first figures. I was immediately hooked as a collector. The idea of creating a custom immediately interested me, because it appealed to both my love of creating clay sculptures and illustrating. My first custom was of a soccer player that I used as a cake topper for my daughter’s birthday cake. It was a lot of fun to create, and when I posted images of it online, I received a lot of great feedback. It wasn’t long after that I started making more and more customs. Creating customs is a fun challenge because it’s a combination of art and puzzle solving. The trick is coming up with a concept and then adapting it to a three dimensional canvas that often has inconvenient contours!

DV: I hear a lot of collectors looking for a Partners Statue Vinylmation set. You have designed a great looking custom 9″/3″ version. What was the biggest challenge in creating this set?

Brian: When I create a custom, I do a lot of planning by sketching the design on the blank Vinylmation template provided on the official site. I then sketch my finished design on a blank create-your-own figure and paint in the details with various solid colors. If I make a mistake, I can always correct it by painting over it with the intended solid color. With the Partners set, I first had to give the figures a faux bronze finish by dry brushing them with many layers of metallic paints. This prevented me from being able to sketch the design for the rest of the details on the figures. I had to paint all the facial and outfit details by freehand with just my template sketches as a reference. There was little room for error, because if I made a mistake, I would have had to go back and dry brush back in the bronze texture and start all over. Also, painting cartoon characters is not too hard because there are a lot of references out there to draw from, but creating a caricature of Walt as he appears in the actual statue took a lot of practice on paper. To complicate things, the nine-inch Vinylmation figure has a very small lower face. The distance between the nose and chin is relatively smaller than it is on the three-inch figure, and Walt had a lot of distinctive features like his mustache and smile that had to be squeezed into that space.

DV: You created a Judge Doom with a ton of special details. Tell us about his different features and was the idea always to give him the extras, or did that develop while you were making him?

Brian: I’m a huge Who Framed Roger Rabbit? fan, and I think Judge Doom is one of the best and one of the most frightening Disney Villains. Unfortunately, it’s impossible to find any good Judge Doom merchandise, so I decided to create a custom inspired by him. By the time I decided to create him, I had a lot of experience making accessories for my figures using dental acrylic. Dental acrylic is great because it is lightweight and strong, and it can be fashioned into any shape. Until Judge Doom, I had used the acrylic to make hats, but fans of Who Framed Roger Rabbit? know that Judge Doom had more than just a hat. In the movie he had sunglasses to mask his sinister red eyes, and because he was actually a toon (spoiler alert! lol), his hand transformed into an anvil and a rotating saw at the end of the film.

From the start I thought it would be cool to create the figure to resemble the character in the early part of the film, and then with the removal of the hat and glasses, it would look as he did at the end. I also wanted the figure to be able to switch between the anvil and the saw without having to pull its entire arm off to make the change.  When you create a crown for a tooth, you shave the tooth into a peg-like shape with minimally tapered walls to allow the crown to fit over the tooth. I used the same principle to shave the right hand of the blank Vinylmation figure into the identical shape I would give a tooth for a crown. I then created the anvil and a spinning saw to fit over the peg-shaped hand. Using an impression of the original hand, I created an acrylic copy of it to fit over the peg shape so it would look like an unaltered figure when I wanted it to. When the figure was complete, I thought it would be amusing to create a stop motion animation of him using the interchangeable parts and the soundtrack from the film. I’m really happy about how he came out, and he looks great on display with my custom Jessica Rabbit.

DV: Do you do commissioned pieces?

Brian: I am open to doing commissioned pieces when time allows. Most have been original designs like custom tombstones with humorous epitaphs similar to the ones around the Haunted Mansion. I’ve also done some work for the Central Jersey Disney Pin Traders, and I recently did a set of wedding cake toppers.

A custom Tombstone that I made for Evilos’ Blind Bag Series 2. 
Note the feet were flocked to have simulated rocks and turf.

DV: Do you have a website where people can view your work?

Brian: I am working on putting something together, and I will let you know when it is ready! In the meantime, if anyone has any questions or requests, they can contact me at customsbybrian@yahoo.com

DV: I have been following your work for a long time now. I am so glad we finally connected and were able to showcase your talents.

Brian: I really appreciate your interest in showcasing my work!!

Spotlight On: Custom Vinylmation Artist Ryan Marella

To have your custom work spotlighted, please send an email to DestinationVinylmation@gmail.com


Destination Vinylmation: Today, we would like to feature your Avengers customs. You seem to have assembled the whole team here. Why don’t you run down the list and point out a detail from each you are most proud of.
Ryan Marella: Creating the Avengers was a lot of fun. I started work on  Captain America first, then I made the HULK, Iron-Man, Thor, Black Widow, Nick Fury and finally Hawkeye. I’m most proud of how all their faces turned out, that really makes a difference when trying to create movie characters. I actually researched each actors faces to see their expressions.

DV: Which one was the hardest to create?
RM: The hardest ones to create would have to be Thor & Black Widow. Getting the right look on their hair and faces took some time.
DV: Do you have a favorite? Both in the comics and as a custom?
RM: My favorite would have to be Black Widow from the customs and Iron Man in the comics.

DV: You also created a 9″ Spiderman and 3″ Peter Parker combo. There is a ton of detail here, but I especially notice the city scape in the eyes and ears. How long did it take to paint this one?
RM: There is a lot of detail I put into both these customs. Inspiration is one thing that drives me to create these amazing customs. I worked all night and all morning on the 9″ Spider-Man which took me 15 hours to finish. I finished the next day and then after I started work on the 3″ Peter Parker in Spidey suit, which I finished within 5 hours time. The cityscape on the eyes came from the Image I was using, I was just going to paint it all white at first, but later changed my mind and used the cityscape to give the effect of glare on his eyes.I also put it on the ears to show that look as if was swinging through the city.

DV: Visit Ryan’s website at www.ryactiv.sketchlab7.com.

Spotlight On: Custom Vinylmation Artist Ryan Marella

To have your custom work spotlighted, please send an email to DestinationVinylmation@gmail.com

Destination Vinylmation: In this article, we will focus on some of your Disney character customs. The Evil Queen is amazing!!! The face is spot-on with the calm yet evil looking expression. But for me, the poison apple steaming in the cauldron is the best part. What do you like best about the front of this one?
Ryan Marella: I had to create some thing different from the ordinary vinyl that we usually see, so I began sketching out ideas and the Idea of having scenes from the movie on the front and back of a vinyl would look amazing. I watched the movie and Googled images of the Evil Queen and it turned out just the way I planned it. My favorite part about the front would have to be the face of the Evil Queen, getting that expression was a fun challenge.

DV: The back is like a whole new vinyl. It’s the Old Hag. You have a knack for painting faces, and this one seems difficult, but I also heard hands are difficult for artists to get just right. Which half of this vinyl was more difficult?
RM: The back was a little easier and I would have to say that hands are a little harder for me than faces.

DV: Lastly we come to Maleficent. You pack so much detail into your creations, how much pre-planning goes into your designs?
RM: Maleficent is one of my favorite pieces that I’ve worked on, I took my time on this one. Pre-planning for this one only took a couple of hours, but sketching on the vinyl  took some time. I do a lot more sketching on the actual vinyl than on paper, it helps to see how it looks on the canvas your working on.

I’ve seen other Maleficent customs but I never see  Diablo the raven  incorporated into the vinyl. I wanted to create a Maleficent custom that would be unique and different from other artists.

DV: I have seen a ton of Maleficent dragons now, and I love the way you painted yours onto the mold like a scene instead of trying to fill the entire canvas with the dragon. Tell us about your favorite parts of this one.
RM: My favorite part of the Maleficent custom would have to be  the Dragon on the back, I put so much time and detail, creating smoke on the background,smoke on the nose and fire in front of the dragon and just the over all look. This particular custom took me 2 days to finish. I was very pleased with what I made. With a little inspiration and some time anything is possible.

DV: To see more of Ryan’s work visit his website: www.ryactiv.sketchlab7.com

Spotlight On: Custom Artist Aaralyn

To have your custom work spotlighted, please send an email to DestinationVinylmation@gmail.com

On the opening day of the new Disney Pixar film Brave, it is fitting to see a custom featuring the heroine Merida. This one comes to us from Aaralyn. I was sad to hear it is already sold out, but Aaralyn has many more customs to look at and order at her website: www.customsbyaaralyn.com. Now let’s take a look at this custom set.

“As soon as I saw the trailers for Brave, I knew it was going to be an amazing movie. The beauty of the animation inspired me to create this custom set. I attended the midnight premier of the movie, and I have to say it lived up to all my expectations and more. It was a phenomenal film.” – Aaralyn

Merida is designed on a 9″ Vinylmation and comes with a custom bow! The bear cubs are expertly painted onto three 3″ vinyls.

“Personally I think Brave is my new favorite Pixar film because there are not many Disney films that portray the entire family unit as well as Brave does. The interactions and emotions between the characters along with the stunning animation and storyline ranks it number one in my book. And of course, there are the baby bears, and I can’t resist cute things.” – Aaralyn

Facebook: www.facebook.com/customsbyaaralyn
Twitter: @ArtistAaralyn
Instagram: @ArtistAaralyn

Spotlight On: Custom Vinylmation Artist Brian Shapiro

To have your custom work spotlighted, please send an email to DestinationVinylmation@gmail.com

Destination Vinylmation: The Rose from Beauty and the Beast is a great example of less is more. Not to say it didn’t take great skill to paint the rose, but it is a simple design that uses the whole package to make an impact. I especially love the fallen petals painted on the base. Tell us a little about the design features. 
Brian Shapiro: Beauty and the Beast is my favorite Disney animated film, and I wanted to do a vinyl inspired by the movie. When I tried to think of which character to feature, I saw a lot of them had already been done by other custom artists. Then I noticed that a common thread in a lot of Beauty and the Beast merchandise like posters and DVD’s was the Enchanted Rose, and I realized that this was almost like another character in the film. It played such a huge part in the story, a little time-clock counting down. I thought it would adapt perfectly to the Vinylmation canvas. In the movie, the rose appears more wilted, but I took some artistic license to make the flower portion fill the entire head of the vinyl. The stem fitted perfectly on the torso, and the arms were an ideal place for falling petals to appear suspended in air. Since the rose was inside a glass dome in the movie, I planned from the start to place the completed Vinylmation in one too. I purchased a small glass domed pocket watch display case from eBay and removed the metal watch stand from the wood base. I then installed a red LED light in the base to cast a dim red glow on the figure at night.

The outside of the base was painted gold, but the inside of the base was painted black so it would blend in with the black areas of the Vinylmation to draw attention away from the Mickey shape. Lastly, I painted some petals on the base that coincided with the one’s painted on the figure’s feet to make them look like they had fallen off the figure. I was really happy with the finished product, and I was excited when Disney released the Animation Series #1 Beast to display it with. I NEVER take nine-inch figures out of the box, so this was the first time!

DV: With your Fantasmic set, I like the way you fit the dragon onto the mold. Did it take a few revisions to settle on the final design? 
Brian: While Beauty and the Beast is my favorite animated film, my favorite show at Walt Disney World, hands down, is Fantasmic, and I couldn’t wait to make a vinyl inspired by it. Of course, the thing that confounded me was that dragon! The body wasn’t a problem since the belly and feet suit a dragon as good as Mickey, but adapting the head was a mess. The fins on the side of the head were troublesome, and I didn’t think it would look right if I extended the dragon’s lower jaw onto the torso of the figure. Before creating this set, I had never made accessories for my figures. I looked at accessories as cheating, so it never occurred to me to glue fins on the side of the head or attach wings and a tail to the back. I decided as much as I hated not having a contiguous head painted on, I would paint the front of the face and the back of the head separately. Of course this made the figure look strange from the side, but I was willing to compromise that. Of course that’s when Disney started creating accessories for their figures like the Have a Laugh series, so I bit the bullet and made a sorcerer’s hat out of dental acrylic for Mickey. That was my very first accessory, and I remember feeling guilty about it! Also, please note that even though the piece is inspired by the Walt Disney World show, I designed the dragon to look more like the Maleficent dragon, which is what the current Disneyland version looks like. Now that Disney released the Animation Series #2 Maleficent dragon, I really like their design approach. In hindsight, I guess I could have painted a contiguous head on my dragon, but I’m proud of my finished set.

DV: You include a base with this 3″/Jr Fantasmic, as you did with the rose. Props or bases seem a common theme in your customs. Where do those “pluses” come in the design process? Do you finish the figures and feel they need a little extra? Or are they in the design from the initial drawing board stage? 
Brian: I really like to plan everything out from the start, because the extras usually affect the painting of the vinyl as you saw with the Enchanted Rose. The base for the Fantasmic set was also planned because I wanted to capture the essence of the scene occurring at the water’s edge. Obviously, I quickly got over my guilt about making accessories for my figures when Disney started to include them frequently in theirs. In fact, I try to include them in many of my designs, and it takes a lot of planning to coordinate them with my paint work. Being a dentist and having the access to the tools and techniques of working with dental resins, I think I’m in a unique position to make some really cool stuff. I think my Judge Doom figure really pushed the limits of what can be done, and as you can tell, the accessories played a large part in the design of that particular Vinylmation’s paint job.

As a side note, if anyone is interested in commissioning custom accessories for their designs, I would be happy to accommodate them. They can contact me at customsbybrian@yahoo.com.

Spotlight On: Custom Vinylmation Artist Ryan Marella


Destination Vinylmation: The Brave 9″ is just remarkable. It looks almost like a chalk painting to me. The shading is beautiful. Can you talk to us about the creation process on this piece?

Ryan Marella: Creating the Brave 9″ custom starts with some research into the character  pics, then a  simple sketch of the character.I was surprised that it took me only one sketch to get the correct expression on Merida .I usually sketch a character out 3 to 4 times before getting the right expression.From the sketch It’s all about painting the right colors and the right  shade.

DV: That is one of the most beautifully draw Meridas I have seen. How long does it take you to get a character down? Have you sketched her a few times before putting her down onto the vinyl canvas?

RM: Achieving the correct textures is all about  trial and error, you have to test all types of brushes on a practice canvas just to see how it translates on to it.It may take some time,but it’s fun to see how each different texture brings life to your art.

DV: The Masters of the Universe triple set is just plain cool. How did you decide to do this set?

RM: I’ve been meaning to create a He-Man set, then in  a forum I go to see many amazing artist post customs, some one asked  if any one has created a he-man custom before……that’s when I decided that  it’s time to create He-Man and the Masters of the Universe customs.

DV: Are any of these available for purchase?

RM: The Brave custom is still for sale, please contact me if you’re interested. The He-Man set in the pic shown has already been sold, but I can always create another,my customs are available for purchase. Please contact me via email jerai022@yahoo.com and visit www.ryactiv.sketchlab7.com.

Spotlight On: Evilos’s Blind Bag Series 3

Evilos’s popular Blind Bag Series is back for a third series! We recently talked to Evilos about what to expect and how and when you can purchase your blind bag.

Destination Vinylmation: What is the Blind Bag Series all about?
Evilos: First, thank you for giving me the opportunity to talk about my latest project! It’s sites like yours that bring content most collectors would never get to read about to the Vinylmation community.

The Blind Bag Series is all about creativity, excitement and mystery! Creativity in the way of one of a kind customs by 21 artists from all walks of life. The artists were more than happy to donate customs to the project and tasked to create holiday themed customs for series three. The customs that have been sent in have blown me away.  Artists have really raised the bar this series.  I’m very proud to have them as a part of Blind Bags Series 3. We will be having a “Best Of Show” event that fans will vote on their favorite custom of the series. The winner will receive a Custom Evilos Trophy proclaiming that artist, “Blind Bags Artist of the Year”.

Artists will also be entered into their own separate raffle to win great prizes like figures and gift cards, just like we did last year, to say thanks for being a part of this project. The greatest joy for me is to give exposure to these great artists that may never get a unique spotlight to display their talents on this level. Blind Bags provides that outlet to them and many commissions have come out of being a part of my series.

Excitement is brought about in the way of cool prizes and side inserts like “The Puzzle Challenge”, which collectors will be challenged to complete a 12 piece puzzle. Each Blind Bags Series 3 box will contain one puzzle piece. There will be a total of 8 complete puzzles.  All the complete puzzles will have the same image making it possible to complete with some effort. Collectors will have the challenging task of collecting all twelve pieces to redeem a prize through buying, selling and trading for pieces. The first collector to send in a complete puzzle will win an Urban 1 complete set with cards. There will be seven other prizes for each completed puzzle sent in including 9″ one of a kind customs and other prizes such as gift cards to the Disney Store.

The mystery of not knowing what each box may contain in terms of figures and prizes makes Blind Bags even more exciting. There will be cool inserts from my personal collection like Park 1’s, Chasers, Variants and other various figures from retired series. There will be many great one of a kind customs including:  9″ customs from John Ward, Javier Soto, Evilos & Gerald Mendez. Blind Bags Series 3 offers a fan something very unique to this hobby, which at this time has not been offered anywhere else. It’s truly the dream product for any Vinylmation fan!

DV: What can people expect from BB3?
Evilos: Each box will have 5 figures, which will include 1 Custom & 4 Random Figures, One puzzle piece, One promo pack of artist business cards that may contain other “Prizes” such as pins or gift cards. What will you get?

DV: How much does a blind bag cost?
Evilos: Price: $100 (USA) Shipping Included

DV: How and when can people purchase a bag?
Evilos: Boxes will be sold Friday September 21st @ 9am (PST)/ 12noon (EST) on the Blind Bags 3 website. There will be a strict limit of two boxes per address. These will sell out fast!

Website: http://evilos.com/Evilos/BB3.html

Artists:
Gerald Mendez
Javier Soto
NRB Relic ‎(Nanette Simard Belgen)
Gemma Steib
Cesilie Keller
Mark J Hoffmann
Dillia Gregory
Jenny Grinsell
Howie Green
Ken Rogers
John Ward
Aaralyn Montgomery
Ben Hudson
Cesar Diaz
Celeste Villanueva
Mark Johhson
Roger Evetts
Dylan Pommer
Panoboard Customs
Jerry Sinner
Josh Edwards
Evilos (Christopher Avalos)

You can find more info about Evilos at evilos.com and view and purchase his work at his eBay store.

Spotlight On: Custom Vinylmation Artist Annemarie

Annemarie is back with some all new custom pieces.

Destination Vinylmation: Both of these new customs look amazing. What do you enjoy more, replicating a Disney character more closely like Mad Hatter or developing your own design like the Scarface and why?

Annemarie: That’s a difficult question to answer; I really enjoy doing Disney characters because in my mind they represent Vinylmation, but it’s really fun to have to start from scratch and figure out how I’m going to approach something totally unique. With Scarface, I tried to do something similar to Villains 2, for example, where you’re focusing more on the face than on the body. I thought he’d look more “serious” this way, as opposed to giving him a squat body and arms. The Mad Hatter was a lot of fun because I had so much color and detail to draw from. I actually had to simplify him a bit to give him a cleaner design.

DV: These customs are for OCVinylDon. Tell us about the trading community he has set up.

AM: VinylmationTraders.com is an online community where folks can post what they have for trade/ what they’d like to trade, and hopefully find someone who can meet their needs and in turn help out! It’s been a great experience for me, every one’s been honest and fair and there’s a place where you can leave good feedback, much like eBay. Don has been the moderator over there, and he does a great job. I’m happy to have added to his collection of customs.

Spotlight On: Custom Vinylmation Artist Annemarie

Annemarie just sent us pictures of her latest custom. It is designed after the boy from La Luna, the new Pixar short that plays before Brave.

Destination Vinylmation: What was it about this character that made you run home after watching La Luna and create him in Vinylmation form?
Annemarie: I may have a sickness, because the first thing I thought when I saw the character was that he’d fit perfectly on a Vinylmation.

Photo Copyright Disney Pixar

DV: Was this design fairly straightforward or did you got through some different options in your head?
AM: He was pretty straightforward. I knew I wanted to capture his expression in the moment where he saw the moon up close. I originally planned to use a Director Mickey hat for his hat, but it didn’t look quite right and would have needed a brim anyway, so I decided to sculpt him his own special hat.

DV: What did you personally take away from this Pixar short?
AM: This short, as all Pixar shorts are, was beautiful. I loved its simplicity.

DV: What is your favorite Pixar short of all-time?
AM: I’ve always loved Geri’s Game the best. Not sure why, I just think the expressions are priceless.

Photo Copyright Disney Pixar